Appearance
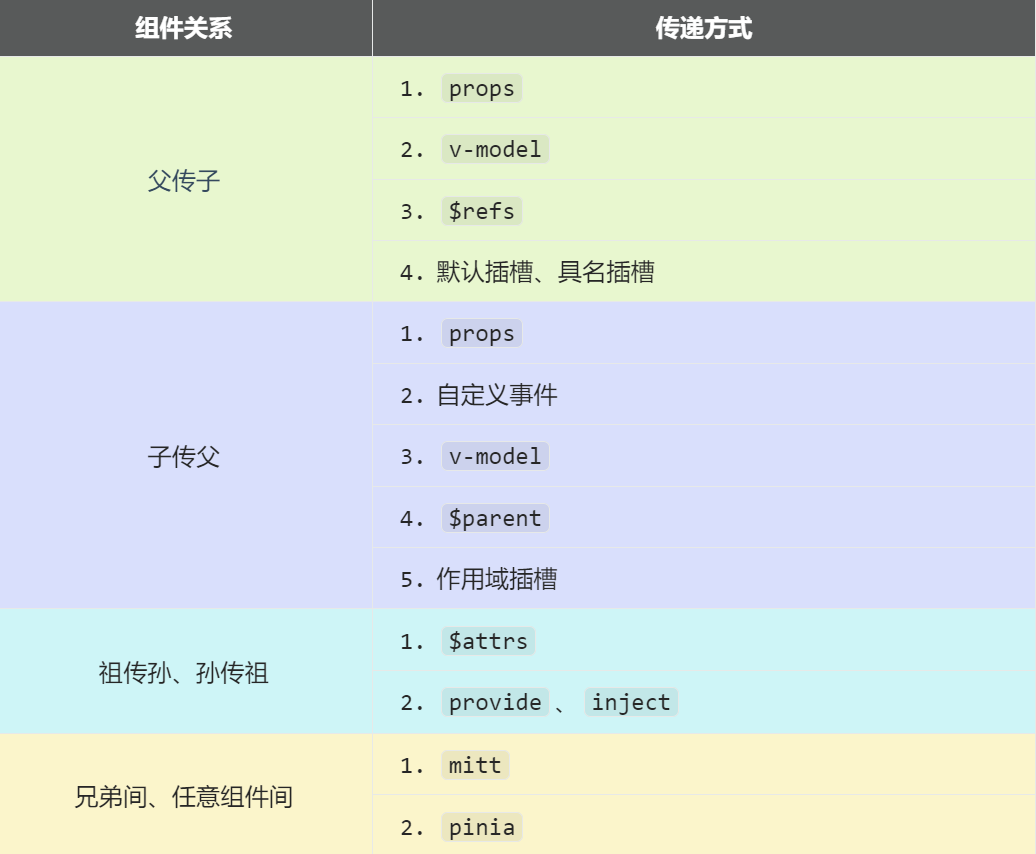
6. 组件通信
Vue3组件通信和Vue2的区别:
- 移出事件总线,使用
mitt代替。
vuex换成了pinia。- 把
.sync优化到了v-model里面了。 - 把
$listeners所有的东西,合并到$attrs中了。 $children被砍掉了。
常见搭配形式:
6.1. 【props】
概述:props是使用频率最高的一种通信方式,常用与 :父 ↔ 子。
- 若 父传子:属性值是非函数。
- 若 子传父:属性值是函数。
父组件:
vue
<template>
  <div class="father">
    <h3>父组件,</h3>
    <h4>我的车:{{ car }}</h4>
    <h4>儿子给的玩具:{{ toy }}</h4>
    <Child :car="car" :getToy="getToy" />
  </div>
</template>

<script setup lang="ts" name="Father">
import Child from './Child.vue'
import { ref } from 'vue'
// 数据
const car = ref('奔驰')
const toy = ref()
// 方法
function getToy(value: string) {
  toy.value = value
}
</script>
子组件
vue
<template>
  <div class="child">
    <h3>子组件</h3>
    <h4>我的玩具:{{ toy }}</h4>
    <h4>父给我的车:{{ car }}</h4>
    <button @click="getToy(toy)">玩具给父亲</button>
  </div>
</template>

<script setup lang="ts" name="Child">
import { ref } from 'vue'
const toy = ref('奥特曼')

defineProps(['car', 'getToy'])
</script>
6.2. 【自定义事件】
- 概述:自定义事件常用于:子 => 父。
- 注意区分好:原生事件、自定义事件。
- 原生事件:
- 事件名是特定的(
click、mosueenter等等) - 事件对象
$event: 是包含事件相关信息的对象(pageX、pageY、target、keyCode)
- 事件名是特定的(
- 自定义事件:
- 事件名是任意名称
- 事件对象
$event: 是调用emit时所提供的数据,可以是任意类型!!!
示例:
html<!--在父组件中,给子组件绑定自定义事件:--> <Child @send-toy="toy = $event" /> <!--注意区分原生事件与自定义事件中的$event--> <button @click="toy = $event">测试</button>js//子组件中,触发事件: this.$emit('send-toy', 具体数据)
6.3. 【mitt】
概述:与消息订阅与发布(pubsub)功能类似,可以实现任意组件间通信。
安装mitt
shell
npm i mitt新建文件:src\utils\emitter.ts
javascript
// 引入mitt
import mitt from 'mitt'

// 创建emitter
const emitter = mitt()

/*
  // 绑定事件
  emitter.on('abc',(value)=>{
    console.log('abc事件被触发',value)
  })
  emitter.on('xyz',(value)=>{
    console.log('xyz事件被触发',value)
  })

  setInterval(() => {
    // 触发事件
    emitter.emit('abc',666)
    emitter.emit('xyz',777)
  }, 1000);

  setTimeout(() => {
    // 清理事件
    emitter.all.clear()
  }, 3000);
*/

// 创建并暴露mitt
export default emitter
接收数据的组件中:绑定事件、同时在销毁前解绑事件:
typescript
import emitter from '@/utils/emitter'
import { onUnmounted } from 'vue'

// 绑定事件
emitter.on('send-toy', (value) => {
  console.log('send-toy事件被触发', value)
})

onUnmounted(() => {
  // 解绑事件
  emitter.off('send-toy')
})
【第三步】:提供数据的组件,在合适的时候触发事件
javascript
import emitter from '@/utils/emitter'

function sendToy() {
  // 触发事件
  emitter.emit('send-toy', toy.value)
}
注意这个重要的内置关系,总线依赖着这个内置关系
6.4.【v-model】
概述:实现 父 ↔ 子 之间相互通信。
前序知识 ——
v-model的本质vue<!-- 使用v-model指令 --> <input type="text" v-model="userName"> <!-- v-model的本质是下面这行代码 --> <input type="text" :value="userName" @input="userName =(<HTMLInputElement>$event.target).value" >组件标签上的
v-model的本质::moldeValue+update:modelValue事件。vue<!-- 组件标签上使用v-model指令 --> <AtguiguInput v-model="userName" /> <!-- 组件标签上v-model的本质 --> <AtguiguInput :modelValue="userName" @update:model-value="userName = $event" />AtguiguInput组件中:vue<template> <div class="box"> <!--将接收的value值赋给input元素的value属性,目的是:为了呈现数据 --> <!--给input元素绑定原生input事件,触发input事件时,进而触发update:model-value事件--> <input type="text" :value="modelValue" @input="emit('update:model-value', $event.target.value)" /> </div> </template> <script setup lang="ts" name="AtguiguInput"> // 接收props defineProps(['modelValue']) // 声明事件 const emit = defineEmits(['update:model-value']) </script>也可以更换
value,例如改成abcvue<!-- 也可以更换value,例如改成abc--> <AtguiguInput v-model:abc="userName" /> <!-- 上面代码的本质如下 --> <AtguiguInput :abc="userName" @update:abc="userName = $event" />AtguiguInput组件中:vue<template> <div class="box"> <input type="text" :value="abc" @input="emit('update:abc', $event.target.value)" /> </div> </template> <script setup lang="ts" name="AtguiguInput"> // 接收props defineProps(['abc']) // 声明事件 const emit = defineEmits(['update:abc']) </script>如果
value可以更换,那么就可以在组件标签上多次使用v-modelvue<AtguiguInput v-model:abc="userName" v-model:xyz="password" />
6.5.【$attrs 】
概述:
$attrs用于实现当前组件的父组件,向当前组件的子组件通信(祖 → 孙)。具体说明:
$attrs是一个对象,包含所有父组件传入的标签属性。注意:
$attrs会自动排除props中声明的属性(可以认为声明过的props被子组件自己“消费”了)
父组件:
vue
<template>
  <div class="father">
    <h3>父组件</h3>
    <Child :a="a" :b="b" :c="c" :d="d" v-bind="{ x: 100, y: 200 }" :updateA="updateA" />
  </div>
</template>

<script setup lang="ts" name="Father">
import Child from './Child.vue'
import { ref } from 'vue'
let a = ref(1)
let b = ref(2)
let c = ref(3)
let d = ref(4)

function updateA(value) {
  a.value = value
}
</script>
子组件:
vue
<template>
  <div class="child">
    <h3>子组件</h3>
    <GrandChild v-bind="$attrs" />
  </div>
</template>

<script setup lang="ts" name="Child">
import GrandChild from './GrandChild.vue'
</script>
孙组件:
vue
<template>
  <div class="grand-child">
    <h3>孙组件</h3>
    <h4>a:{{ a }}</h4>
    <h4>b:{{ b }}</h4>
    <h4>c:{{ c }}</h4>
    <h4>d:{{ d }}</h4>
    <h4>x:{{ x }}</h4>
    <h4>y:{{ y }}</h4>
    <button @click="updateA(666)">点我更新A</button>
  </div>
</template>

<script setup lang="ts" name="GrandChild">
defineProps(['a', 'b', 'c', 'd', 'x', 'y', 'updateA'])
</script>
6.6. 【$refs、$parent】
概述:
$refs用于 :父 → 子。$parent用于:子 → 父。
原理如下:
属性 说明 $refs值为对象,包含所有被 ref属性标识的DOM元素或组件实例。$parent值为对象,当前组件的父组件实例对象。
6.7. 【provide、inject】
概述:实现祖孙组件直接通信
具体使用:
- 在祖先组件中通过
provide配置向后代组件提供数据 - 在后代组件中通过
inject配置来声明接收数据
- 在祖先组件中通过
具体编码:
【第一步】父组件中,使用
provide提供数据vue<template> <div class="father"> <h3>父组件</h3> <h4>资产:{{ money }}</h4> <h4>汽车:{{ car }}</h4> <button @click="money += 1">资产+1</button> <button @click="car.price += 1">汽车价格+1</button> <Child /> </div> </template> <script setup lang="ts" name="Father"> import Child from './Child.vue' import { ref, reactive, provide } from 'vue' // 数据 let money = ref(100) let car = reactive({ brand: '奔驰', price: 100, }) // 用于更新money的方法 function updateMoney(value: number) { money.value += value } // 提供数据 provide('moneyContext', { money, updateMoney }) provide('car', car) </script>注意:子组件中不用编写任何东西,是不受到任何打扰的
【第二步】孙组件中使用
inject配置项接受数据。vue<template> <div class="grand-child"> <h3>我是孙组件</h3> <h4>资产:{{ money }}</h4> <h4>汽车:{{ car }}</h4> <button @click="updateMoney(6)">点我</button> </div> </template> <script setup lang="ts" name="GrandChild"> import { inject } from 'vue' // 注入数据 let { money, updateMoney } = inject('moneyContext', { money: 0, updateMoney: (x: number) => {} }) let car = inject('car') </script>
6.8. 【pinia】
参考之前pinia部分的讲解
6.9. 【slot】
1. 默认插槽
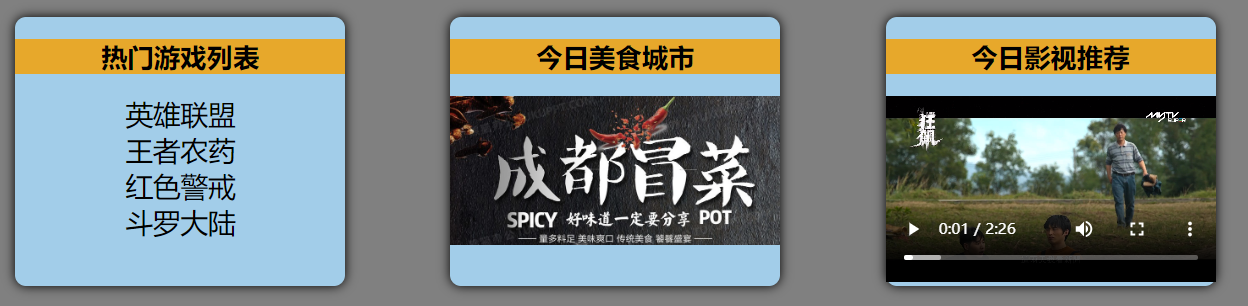
vue
父组件中:
<Category title="今日热门游戏">
          <ul>
            <li v-for="g in games" :key="g.id">{{ g.name }}</li>
          </ul>
        </Category>
子组件中:
<template>
  <div class="item">
    <h3>{{ title }}</h3>
    <!-- 默认插槽 -->
    <slot></slot>
  </div>
</template>
2. 具名插槽
vue
父组件中:
<Category title="今日热门游戏">
          <template v-slot:s1>
            <ul>
              <li v-for="g in games" :key="g.id">{{ g.name }}</li>
            </ul>
          </template>
          <template #s2>
            <a href="">更多</a>
          </template>
        </Category>
子组件中:
<template>
  <div class="item">
    <h3>{{ title }}</h3>
    <slot name="s1"></slot>
    <slot name="s2"></slot>
  </div>
</template>
3. 作用域插槽
理解:数据在组件的自身,但根据数据生成的结构需要组件的使用者来决定。(新闻数据在
News组件中,但使用数据所遍历出来的结构由App组件决定)具体编码:
vue父组件中: <Game v-slot="params"> <!-- <Game v-slot:default="params"> --> <!-- <Game #default="params"> --> <ul> <li v-for="g in params.games" :key="g.id">{{ g.name }}</li> </ul> </Game> 子组件中: <template> <div class="category"> <h2>今日游戏榜单</h2> <slot :games="games" a="哈哈"></slot> </div> </template> <script setup lang="ts" name="Category"> import { reactive } from 'vue' let games = reactive([ { id: 'asgdytsa01', name: '英雄联盟' }, { id: 'asgdytsa02', name: '王者荣耀' }, { id: 'asgdytsa03', name: '红色警戒' }, { id: 'asgdytsa04', name: '斗罗大陆' }, ]) </script>